
Why buy it when you can make it even more YOU?
One of my absolute favorite things about container gardening is that you don’t need a big budget to make your patio look incredible. A plain, boring nursery pot from the garden center can become a genuine work of art with a few supplies and a free afternoon. And the best part? Every single pot will be completely unique — nobody else will have one exactly like yours.
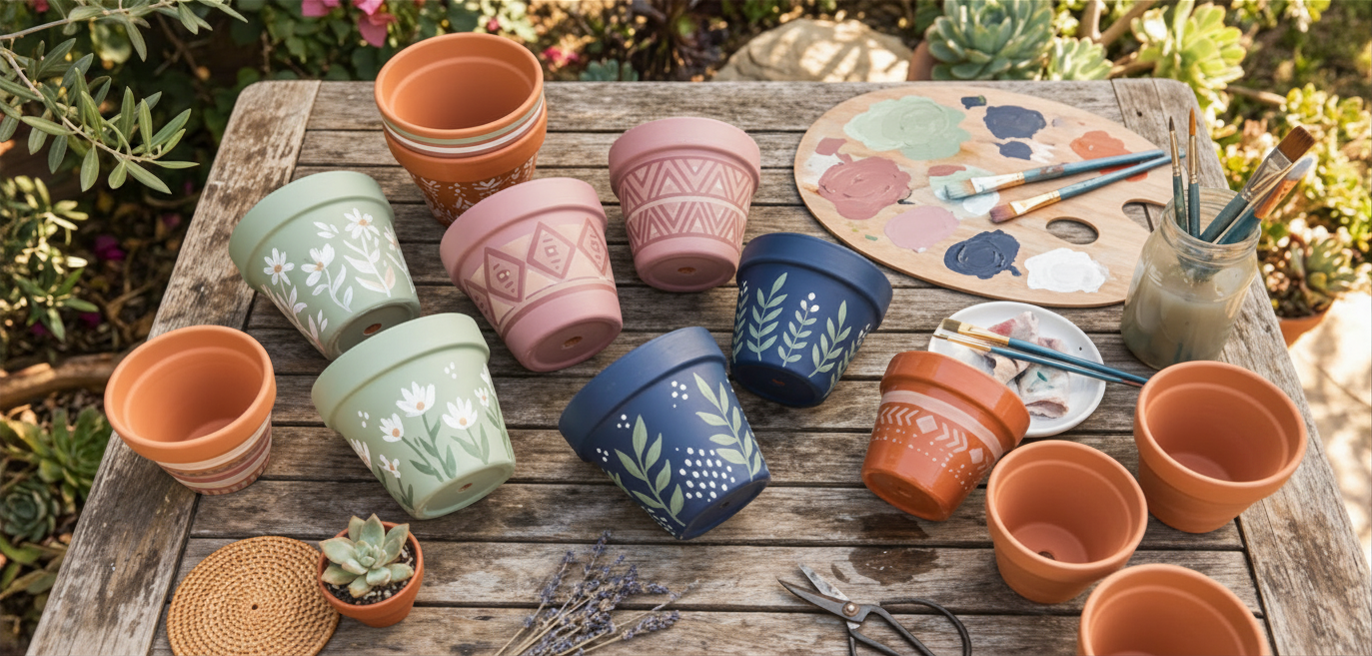
I’ve been painting pots for years and I’ve made every mistake in the book so you don’t have to. In this post I’m sharing my complete beginner’s guide to DIY painted planters — the right paints to use, my favorite techniques, how to seal them so they last, and of course, some beautiful design ideas to inspire you!
Whether you’re a total craft beginner or a seasoned DIY-er, I promise this is easier than you think. Let’s get into it!
1. 🎨 What Paint to Use on Pots (This Part Matters!)
The number one mistake beginners make is grabbing whatever paint they have around the house. Interior wall paint or craft acrylics without the right sealer will peel, fade, and look terrible within a season. Here’s what actually works:
Best Paints for Terracotta & Ceramic Pots
Outdoor acrylic paint — This is my go-to for 90% of my projects. DecoArt Americana Outdoor Living and Folkart Outdoor are both excellent. They’re weatherproof, come in gorgeous colors, and are very beginner-friendly.
Chalk paint — Gorgeous matte finish and zero prep needed — it sticks to almost anything! Perfect for that vintage, aged look. Seal well afterward for outdoor use.
Spray paint — Fast, smooth, and perfect for a solid base coat. Use outdoor-rated spray paint (Rust-Oleum 2X is great). Always prime terracotta first so the paint doesn’t get absorbed.
💡 Shopping tip: This DecoArt Patio Paint Set is my top pick for pot painting — it’s specifically formulated for terra cotta and outdoor surfaces, so NO extra sealer required! 24 gorgeous coordinated colors, and it’s totally beginner-proof. If you use this paint, you can actually skip the sealing step entirely. ($24.99)
2. 🖌️ The Supplies You’ll Need
Good news — you don’t need much! Here’s my complete starter kit:
- Terracotta or plain ceramic pots (any size — even $1 nursery pots work!)
- Outdoor acrylic paint in your chosen colors
- Foam brushes and a few small round brushes for detail work
- A wide flat brush for base coats
- Painter’s tape (for geometric designs)
- A palette or paper plate for mixing
- Outdoor sealer/varnish (ESSENTIAL — unless you’re using DecoArt Patio Paint, which is self-sealing!)
- Sandpaper (180 grit) to lightly rough up glazed pots
- Rubbing alcohol to clean the surface before you start
💡 Shopping tip: This foam brush set is perfect for pot painting — the different sizes cover everything from base coats to fine details, and they’re super cheap so you don’t feel bad throwing them away when you’re done. ($8.99)
3. ✏️ How to Prep Your Pots (Don’t Skip This!)
Prep is everything. A few minutes of prep means your paint will last for years instead of peeling off after the first rainstorm.
For Terracotta Pots:
- Wipe down with rubbing alcohol and let dry completely (at least 10 minutes)
- Seal the inside of the pot with a coat of mod podge or watered-down PVA glue — this stops the terracotta from absorbing all your paint
- Let dry completely before painting
For Glazed Ceramic Pots:
- Lightly sand the surface with 180-grit sandpaper — this gives the paint something to grip onto
- Wipe off dust with a damp cloth, then clean with rubbing alcohol
- Apply a light coat of spray primer for the best adhesion
4. 🌸 5 Beautiful Pot Painting Techniques
Now for the fun part! Here are my five favorite techniques — from super simple to a little more adventurous. Start with whichever feels right for your skill level!
Technique 1 — Solid Color with a Pattern Border ⭐ Easiest

Paint the whole pot one solid color, then add a simple stripe, dot, or zigzag border around the rim using painter’s tape for crisp lines. This is beginner-proof and looks incredibly polished.
Try this color combo: Terra cotta orange base + white geometric border. So Mediterranean!
Technique 2 — Color Blocking ⭐⭐ Easy

Use painter’s tape to divide your pot into sections, then paint each section a different color. Remove the tape while the paint is still slightly wet for the crispest lines. The result looks modern and intentional.
Try this color combo: Sage green + cream + dusty rose — so cottagecore!
Technique 3 — Ombre/Gradient ⭐⭐ Easy-Medium

Start with your darkest color at the bottom, lightest at the top (or vice versa!), and blend while still wet using a dry brush. This looks incredibly sophisticated and is much easier than it sounds. Pro tip: use colors from the same family for the smoothest blend.
Try this color combo: Deep navy fading up to sky blue — so coastal!
Technique 4 — Botanical Leaf Prints ⭐⭐ Easy-Medium

Pick leaves from your garden, brush them with paint, and press firmly onto your pot. Lift carefully to reveal a perfect botanical print! Ferns, monstera leaves, and eucalyptus all work beautifully. No artistic skill required — nature does the work!
Try this color combo: White pot + green leaf prints — simple, fresh, and absolutely gorgeous.
Technique 5 — Hand-Painted Florals ⭐⭐⭐ Medium

Don’t be intimidated! Simple 5-petal flowers are much easier than they look — just make five teardrop shapes around a dot center. Add some simple leaves and you have a beautiful botanical design. Look up ‘simple folk art flowers’ on YouTube for great tutorials.
Try this color combo: Deep green base + white and blush pink florals — so romantic and boho.
💡 Shopping tip: Painter’s tape is your best friend for clean lines! I always use this thin detail tape for curved pot surfaces — it bends better than regular painter’s tape and gives you those sharp edges. ($7.49)
5. 🛡️ How to Seal Your Pots (ESSENTIAL — Unless You Used DecoArt Patio Paint!)
This is the step people skip — and then wonder why their beautiful pot looks terrible after one rainy week. Sealing is non-negotiable for outdoor pots! The one exception: if you used the DecoArt Patio Paint Set I recommended above, you’re already covered — it’s self-sealing and weatherproof right out of the bottle. Lucky you! Everyone else, read on.
The best outdoor sealers: Krylon Crystal Clear Acrylic, Rust-Oleum Gloss Finish, or DecoArt Triple Thick are all excellent. Choose matte for a natural look or gloss for something more vibrant and easy-clean.
How to Seal:
- Let your paint dry completely — at least 24 hours, ideally 48
- Apply 2-3 thin coats of outdoor sealer, letting each coat dry fully
- Pay extra attention to the rim and base where water collects
- Allow a full 72 hours before placing outdoors
💡 Shopping tip: This outdoor spray sealer is my absolute favorite — it goes on smooth with no brush marks, dries crystal clear, and my sealed pots have survived multiple SoCal winters looking gorgeous. ($8.99)
6. 💡 My Favorite Design Ideas by Patio Style
Need some design inspiration? Here are my favorite pot painting ideas matched to the patio styles we covered in Blog Post #1!
🌿 Boho Eclectic
- Terracotta base with white hand-painted mandalas or geometric patterns
- Multicolor stripes in jewel tones — purple, teal, mustard, terracotta
- Freehand botanical prints with multiple plant types
🌊 Coastal & Beachy
- Soft white base with navy blue color block at the base
- Sandy beige pot with a rope wrapped around the rim (glue on and seal)
- Light blue ombre fading from deep ocean blue to pale aqua
🌸 Cottage Garden
- Cream or pale pink base with hand-painted wildflowers
- Distressed chalk paint finish in dusty rose or lavender
- White pot with green botanical leaf stamps
🌵 Desert & Southwestern
- Classic terracotta with white geometric border patterns
- Warm clay base with turquoise and rust color blocking
- Simple cactus or succulent silhouettes in contrasting colors
🖤 Modern Minimalist
- All matte black with a simple thin gold stripe
- Pure white with a single bold geometric shape in black
- Concrete-look paint finish (sponge technique — super easy!)
🍋 Mediterranean & Tuscan
- Classic terracotta with cobalt blue hand-painted folk art motifs
- White with yellow lemon and green leaf prints
- Aged fresco look — apply paint unevenly and sand back lightly when dry
🎨 Colorful & Maximalist
- Go wild! Every color, every pattern, no rules
- Mosaic-inspired geometric designs with 5+ colors
- Bold abstract brushstrokes — think Matisse!
Ready to Get Painting? 🎨
I hope this has given you the confidence to grab some pots and get creative! I promise it’s so much easier than it looks, and the results are incredibly satisfying. There’s something so special about putting plants in containers you painted yourself.
Remember: there are no mistakes in pot painting — only happy accidents. Even the imperfect ones end up being your favorites!
I’d love to see what you create! Share your painted pots in the comments below — I’ll be featuring reader creations in an upcoming post!
And if you missed Blog Post #1 on finding your patio style, go check that out first. Knowing your style makes choosing your pot colors and patterns so much easier! 🌿
Happy painting! 🌸
— Pretty Pots & Patios